As a developer, I want to write code. I want to push my changes to git, get notified when I break the build or tests, fix and then repeat. Is that too much to ask? Apparently, because setting this up in 2017 is still kind of a nightmare. But does it have to be?
In this post we’ll see how we can achieve it all through a series of simple steps:
Configure CircleCI to build and test your app on each change pushed to Github
Build a Docker image with updated code and push it to Azure Container Registry
Host your app on Azure and continuously deploy new changes using webhooks
But CICD is terrifying!
— Possibly You. Possibly just now.
You might also think it’s not your job and you need to know all things about Docker and Kubernetes and Swarm and .. and .. Spoiler alert! Continuous Integration / Delivery (CI/CD) can help you save time and it’s not that hard to get started!
CICD
Continuous Integration (CI) is a development practice that requires developers to integrate code into a shared repository several times a day.
Continuous Delivery (CD)is a software development discipline where you build software in such a way that the software can be released to production at any time.
To start building your CICD pipeline, you could write your own shell scripts from scratch. But if you like easy, there are a lot of tools that can make your life a lot easier.
Continuous Integration Tools
One of my favourite tools is CircleCI because it has a nice UI and it’s free for open source projects. All you need to get started with CircleCI is a GitHub or Bitbucket account. Go to https://circleci.com/ and sign up for a new account.
Setup CircleCI
Let’s create a new project using the Angular CLI and push it to GitHub. If you have an existing project, you can move on to the next steps.
$ ng new awesome-app
In CircleCI, configure your new awesome project to build and run tests by following the steps below.
Go to Projects tab and click ‘Add project”
Choose the ‘awesome-app’ project and click ‘Setup project’
Leave defaults for operating system and version
Pick your language of choice, for example, Node
In the root of your project, create a folder named .circleci and add a file config.yml. Copy and paste the gist bellow into the new file.
version: 2
jobs:
  build:
    docker:
      - image: circleci/node:6-browsers

    working_directory: ~/repo

    steps:
      - checkout

      - restore_cache:
          keys:
          - v1-dependencies-{{ checksum "package.json" }}
          # fallback to using the latest cache if no exact match is found
          - v1-dependencies-

      - run: yarn install

      - save_cache:
          paths:
            - node_modules
          key: v1-dependencies-{{ checksum "package.json" }}

      - run: yarn ng build --prod --build-optimizer --no-progress
      - run: yarn ng test --single-run --no-progress
There’s a few key things happening here:
In CircleCI, a run is comprised of one or more named jobs. At the moment our config only defines one job, called build. This job is the default entry-point for a run that is triggered by a push to Github.
We also need to define a place where our jobs will run. This is called an executor in CircleCI and there are two options: use docker or a full virtual machine. Let’s use docker for now and use the circleci/node:6-browsers image.
A job is a collection of steps that run commands for us
CircleCI can make our builds faster by caching our node_modules
Finally, we run commands to build our project for production and run tests using Angular CLI
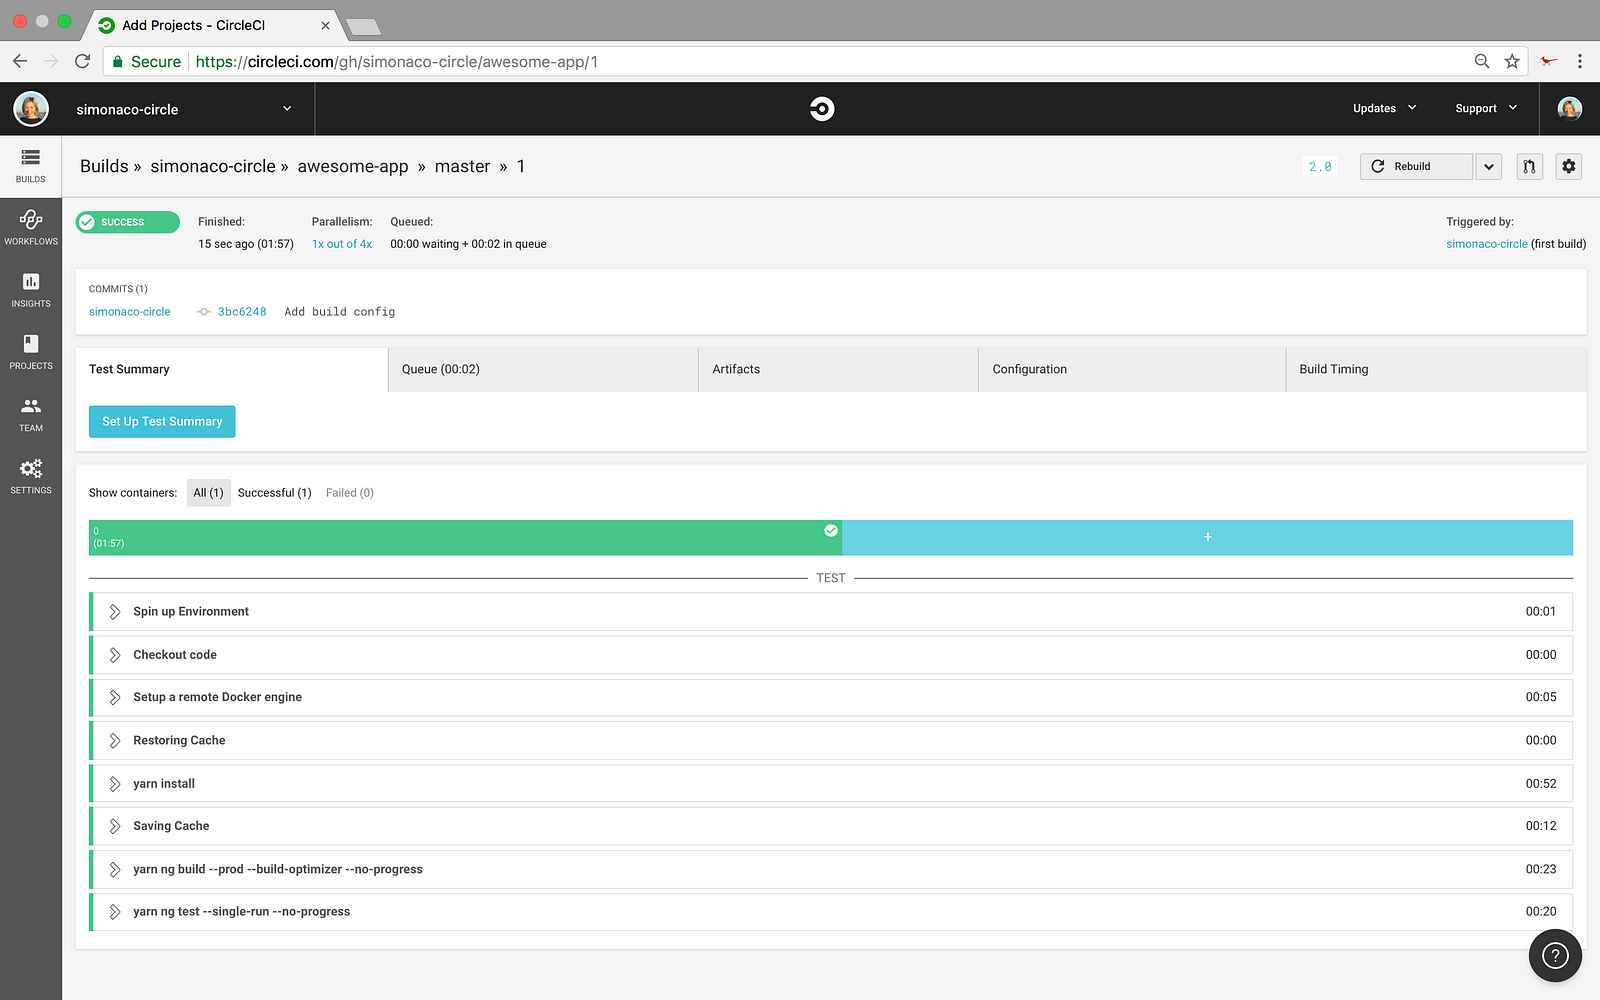
At this point, we have automated the build and test runs so let’s go ahead and see some results! Push the config file to GitHub and in CircleCI click ‘Start building’. You will be redirected to a page where you can see the status of your running build. If everything is correct, your run should complete successfully in about a minute.
CircleCI first run result
Awesome! Let’s next look into configuring Docker and Azure
To store your docker images, open the Azure portal and create new Azure Container Registry (ACR).
Azure Container Registry allows you to store images for all types of container deployments including DC/OS, Docker Swarm, Kubernetes, and Azure services such as App Service, Batch, Service Fabric, and others. Your DevOps team can manage the configuration of apps isolated from the configuration of the hosting environment.
Create Azure Container Registry
Edit config.yml to build and push docker images to ACR. Copy and paste the config below and replace awesomeapp.azurecr.io with your own Login Server value. You can find it on the Overview page of your new container registry.
version: 2
jobs:
  build:
    docker:
      - image: circleci/node:6-browsers

    working_directory: ~/repo

    steps:
      - checkout
      - setup_remote_docker

      - restore_cache:
          keys:
          - v1-dependencies-{{ checksum "package.json" }}
          # fallback to using the latest cache if no exact match is found
          - v1-dependencies-

      - run: yarn install

      - save_cache:
          paths:
            - node_modules
          key: v1-dependencies-{{ checksum "package.json" }}

      - run: yarn ng build --prod --build-optimizer --no-progress
      - run: yarn ng test --single-run --no-progress
      - run:
          command: |
            docker build -t awesomeapp.azurecr.io/angular-cli-nginx:1.0 .
      - run:
          command: |
            docker login --username $DOCKER_USER --password $DOCKER_PASS awesomeapp.azurecr.io
      - run:
          command: |
            docker push awesomeapp.azurecr.io/angular-cli-nginx:1.0
Updated config.yml including docker config
To retrieve your container registry login details go to the Access Keys tab in the Azure Portal. On this page, copy the username field. Go to CircleCI, project settings, environment variables. Click Add Variable, give it the name DOCKER_USER and paste the username you copied earlier. Follow the same steps to setup DOCKER_PASS, but this time copy the password field.
Web App is a fully managed compute platform that is optimized for hosting websites and web applications.
Create Azure Web App for Containers
Configure continuous deployment of your app using webhooks. The first thing you need to do is create a new Webhook. Open the portal and go to your new container registry. Click on the webhooks link in the left hand side menu and add a new webhook. You need to define a name, a ‘Service URI’ and a few other values. You can build your service uri by downloading the publish profile config from the web app overview page. It should look like this
Replace the placeholders with the actual values from your publish profile. Once you have this configured you need to specify which events will trigger the webhook. Choose push to listen to docker push events.
The final step after creating this webhook is enabling CI in your web app. In the portal, choose the awesome-app and click on the Application Settings link. On this page add a new variable called DOCKER_ENABLE_CI with the value true and then Save.
Create webhook to continuously deploy your changes
Push the updated config.yml file to GitHub to trigger a new build with the new changes.
At this point, whenever we push a new change to GitHub, a new CircleCI run should start. This will build your app, run tests against the new code and finally deploy it to the cloud.


Leave a Reply